-
[ React ] axios , json-server 를 이용한 통신 실습TIL 2024. 2. 19. 20:26728x90

axios는 node.js와 브라우저를 위한 Promise 기반 http 클라이언트이다.
다시 말해 http를 이용해서 서버와 통신하기 위해 사용하는 패키지이다.
우선 axios를 통해 서버 통신 실습을 하기 위해 axios, json-server 환경을 설치해보도록 하자.
yarn add axios
yarn add json-server
설치 확인은 package.json 에서 확인 가능하다.
다음으로 임의의 db.json 파일을 생성해 json-server에서 확인해보도록 하자.
( db.json 은 루트 경로에 파일 생성 )
// db.json
{
  "todos": [
    {
      "id": "2",
      "title": "스프링 공부하기",
      "contents": "인강 열심히 들어보기!!",
      "isDone": true
    },
    {
      "id": "3",
      "title": "데이트",
      "contents": "홍대입구역에서 3시까지",
      "isDone": true
    },
    {
      "id": "d41d",
      "title": "asdf",
      "contents": "asdf",
      "isDone": false
    },
    {
      "id": "7272",
      "title": "asdfasd",
      "contents": "fasdfasdf",
      "isDone": false
    },
    {
      "id": "b986",
      "title": "asdf",
      "contents": "asdfsdfs",
      "isDone": false
    },
    {
      "id": "2675",
      "title": "asdf",
      "contents": "asdfasdfasf",
      "isDone": false
    }
  ]
}
db.json 파일 세팅이 완료되었다면 json-server 를 실행해보도록 하자.
yarn json-server --watch db.json --port [원하는 포트]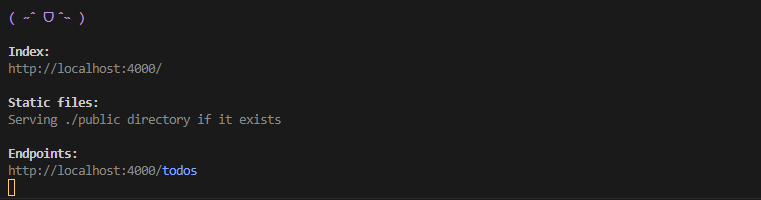
저런 이상한 이모티콘과 함께 엔드 포인트가 뜬다면 성공이다. 저 주소로 들어가보면,
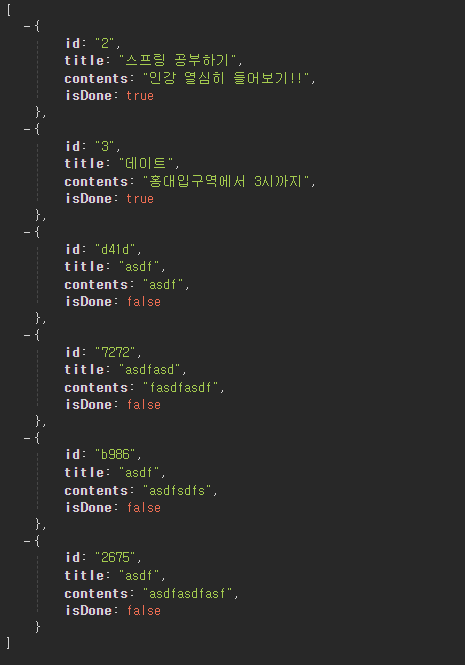
localhost:4000/todos 라는 주소에서 아까 db.json에 생성했던 내용들이 나타나는 것을 볼 수있다.
이번엔 데이터 통신을 순수 axios가 아닌 axios 인스턴스를 통해 설정하고, 요청/응답 인터셉터를 추가해보도록 하자.
우선 기본적인 App.jsx 구조는 이렇게 만들어두고,
import { useEffect, useState } from "react";
import api from "./axios/api";

function App() {
  const [posts, setPosts] = useState([]);

  useEffect(() => {
    const fetchPosts = async () => {
      try {
        const response = await api.get("/posts");
        setPosts(response.data);
      } catch (error) {
        console.error("There was an error!", error);
      }
    };

    fetchPosts();
  }, []);

  return (
    <div>
      <h1>Posts</h1>
      {posts.map((post) => (
        <div key={post.id}>
          <h2>{post.title}</h2>
          <p>{post.body}</p>
        </div>
      ))}
    </div>
  );
}

export default App;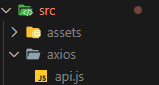
src 폴더 안에 axios 라는 폴더를 생성한 후, 그 안에 api.js 라는 파일을 생성한다.
import axios from "axios";

// Axios 인스턴스를 생성합니다. App.jsx
const api = axios.create({
  baseURL: "http://localhost:4000",
});

// 요청 인터셉터 추가
api.interceptors.request.use(
  function (config) {
    console.log("요청합니다 !");
    return config;
  },
  function (error) {
    console.log("요청 오류 !");
    return Promise.reject(error);
  }
);

// 응답 인터셉터 추가
api.interceptors.response.use(
  function (response) {
    console.log("응답합니다 ! ");
    return response;
  },
  function (error) {
    console.log("응답 실패 !");
    return Promise.reject(error);
  }
);

export default api;
axios.create 의 baseURL 설정을 통해 url 설정을 const api 에 저장하고,
api.interceptors.request.use() 를 통해 요청 인터셉터 추가를,
api.interceptors.response.use() 를 통해 응답 인터셉터를 추가한다.
각 인터셉터 안에는 요청/요청 오류 , 응답/응답 오류 의 함수가 들어간다.
설정이 완료되었다면 아래와 같은 화면이 나타난다.

db.json 에 있는 내용을 잘 불러와서 보여준다 !
콘솔에 찍힌 로그들도 살펴보자.
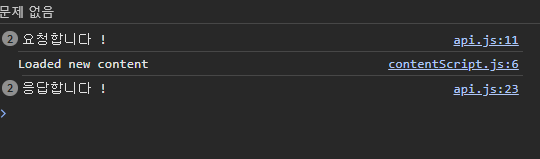
아까 설정해뒀던 요청, 응답 인터셉터가 잘 작동하는 것을 볼 수 있다.
요청 / 응답 실패도 확인해보자.
const api = axios.create({
  baseURL: "http://localhost:4000",
  timeout: 1,
});
baseURL 아래에 timeout 설정을 통해 axios 요청의 제한시간을 둘 수 있다.
요청이 0.001 초안에 응답 받지 못하면 자동으로 취소 되는 것이다.
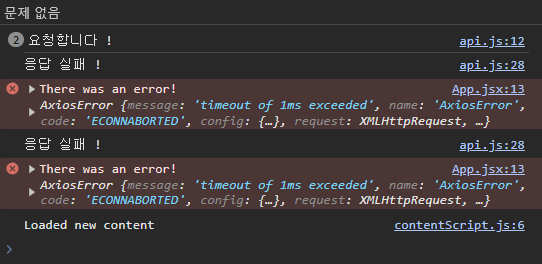
요청 / 응답 실패시 작성해뒀던 인터셉터가 잘 작동하는 것을 확인할 수 있다 !!
728x90'TIL' 카테고리의 다른 글
[ React ] 쉽고, 직관적인 React Query (0) 2024.02.22 [ React ] 리덕스 미들웨어 - Redux Thunk (1) 2024.02.20 [ React ] 빠른 Frontend 개발을 위한 툴, Vite ! (0) 2024.02.16 [ JSON ] JSON에 대한 기초 지식 (0) 2024.02.14 [ React ] Redux 기본 설정 방법 (0) 2024.02.07